|
| |||||||||||||||||
|
(Adobe Color Table - ACT Files) All the graphics in Monster Truck Madness 1 & 2 are in RAW and ACT file format. The RAW file is the image itself but this format contains very little information, so the game uses corresponding ACT files to know where the colors should go. Without the ACT file, mtm would be a black and white game. Traditionally, one of the hardest parts about creating custom textures was dealing with ACT files. The letters A.C.T. stand for Adobe Color Table which is a standard color palette for Photoshop by Adobe. This meant that unless you owned Photoshop, you were out of luck. And, of course, the problem was/is that Photoshop is very expensive. Thankfully, there are a lot of industrious programmers out there due to whose talents we are no longer a slave to Photoshop, we can use almost any program to work with textures, and, as a result, our workload has been cosiderably reduced. This page will look at four methods for dealing with ACT files. The Photoshop method with a new twist Photoshop Nice if you have it but few people do, so I won't belabor the point at length here except to say that Terminal Reality has come out with a nifty little plug-in that makes loading Raw and Act files simple. First, download the plugin.
Unzip this to the "\Adobe\Photoshop 5.0\Plug-Ins\File Formats" folder
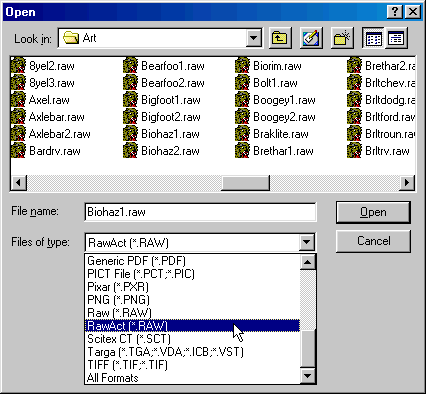
and you're in business. Now, when you want to open a Raw file, select
"RawAct" instead of "Raw" from the "Files of type" option. Like this:
When you click Open, the Act file will load automatically with the raw file into Photoshop. You are ready to work with your color texture. Please note, however, that the plug-in does not save the act file automatically. You must save it separately in the usual way. Remember it's always a good idea to save a back up in JPG or GIF or BMP format. To learn how to use Photoshop, please see MIYH's texture help pages. Note. This plug-in does not work with Paint Shop Pro. Mdmre's Palette Master Mdmre's Palette Master will convert ACT files into PAL files that can be used in the much cheaper and readily available Paint Shop Pro. If you haven't already got Palette Master, download it here. Also, you will need mdmre's support files (315k) if you do not have them already.
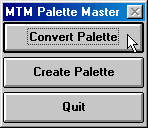
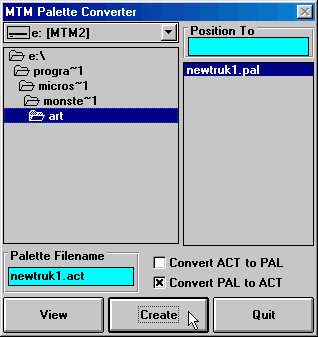
Double click the mtmpmstr.exe. This option box will appear:
Click "Convert Palette" and the program will open.
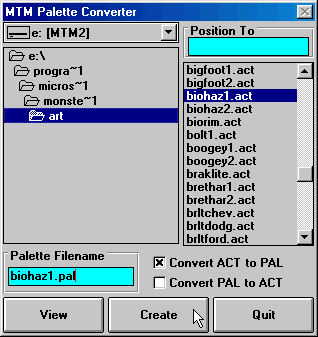
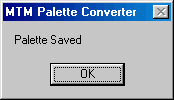
Check the "x" beside Convert ACT to PAL, browse to and select the ACT file that corresponds to the texture you want to work with, type the new palette name in the Palette Filename box (be sure to include the PAL extension), and finally click Create. A confirmation box will tell you the new palette has been made.
Now you can load the texture and it's new PAL file into Paint Shop Pro. You are ready to work with your texture. For a few notes on how to load textures into PSP, please click here. Okay, once your texture is the way you want, and you've saved in RAW format and created a PAL file for it, you have to reverse the above steps to convert the PAL file back into an ACT file. Double click mtmpmstr.exe. Again, the option box appears.
And again, select Convert Palette. The program opens.
This time, check the "x" beside Convert PAL to ACT, browse to and select the PAL file you just created for your new texture, type the new ACT file name in the Palette Filename box (be sure to include the ACT extension), and finally click Create. Again, a confirmation box will tell you the new palette has been made.
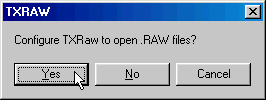
You are now ready to use your texture in the game (i.e., you can map it to a truck or model, or you can use a texture replacer to apply it to the bin you want to use). Yes, this is probably a lot of work, especially when you consider you must repeat this process for every single texture you want to work with. Keep in mind, however, that until only a few short weeks ago, mdmre's Palette Master was the only valid alternative to Photoshop. This utility makes it possible to edit textures with an affordable program. The Guitar Bill method Properly speaking, this is not an intended method of converting palettes - especially not for use with trucks since Guitar Bill's programs are aimed primarily at track making. However, two of Bill's programs are made to order for the task and, so, cannot be excluded from any serious discussion about ACT files because these programs, when used together, all but eliminate the need to pay attention to ACT files. Let's take them one at a time. The first program is TxRaw. If you do not have this, then download it now. Unzip to any folder you like. Note, however, that the program will have to stay in the same place, so choose a permanent spot. The mtm folder is usually a good place. Now double click the TxRaw.exe. The following program set up box will appear.
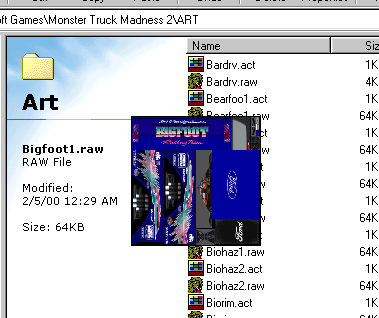
Click Yes to associate RAW files with TxRaw. That's it, the program is now set to use. Briefly, TxRaw is a texture viewer program. In windows explorer, just double click any RAW file and a pop up graphic of that texture will appear. Like this.
Click the image and it will disappear. The point for us here is that when the image appears in windows explorer, it is automatically copied to the windows clipboard at the same time. Therefore, all you need to do is click the "paste" button in ANY paint program
and the texture will load - color palette and everything. No more work than that. You just go ahead and paint the texture. When you are done, save the texture in any format you like for back up purposes. The second program you will need is Traxx. Yes, that's right, the track building program. If you do not have it, then download it here. Unzip Traxx to any folder. The first time you open it, you will be prompted for models and art folder preferences. Set them to default or set them to where you have your art located. Okay, with your texture open in a paint program, make sure it is 256 color 8 bit format. Now click the copy button.
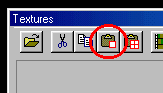
Now, open Traxx and on the menu goto View>Textures.
This will open the textures box. Now simply click the paste button.
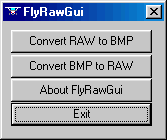
You will be prompted to give your texture a name. Type it and click okay and Traxx will automatically create a RAW file and it's corresponding ACT file. Your done, and ready to use your texture in the game. Reminder. MTM 1&2 use 64x64 and 256x256 pixel textures. Traxx will not allow you to create the wrong size. Using TxRaw and Traxx may not seem like the tidiest arrangement and it can certainly feel odd using a track making program to create textures for your truck (or models), but there are no messy palette conversions or awkward loading procedures to worry about and the process is so simple that you'll soon wonder how you got by without them. FlyRawGui FlyRawGui was created by Frank Racis and it was originally intended for use wtih Terminal Reality's flight simulation game called Fly! which uses the same graphic file formats as Monster Truck Madness. FlyRawGui will convert any RAW and ACT file to a standard windows BMP file. And, it will convert it back again. For this program to work, it must be in the same folder as the textures. You can copy it to your art folder, or you can copy the specific textures you want to the FlyRawGui location. Double click FlyRawGui.exe and the following prompt box appears.
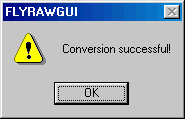
Choose Convert RAW to BMP and a standard windows box will appear. Browse to the RAW file you want and click open. The BMP is created. You will see the following confirmation prompt. Click okay.
Now just open the BMP in any paint program and edit it the way you want. When you are ready, save the BMP with a new name. Click the FlyRawGui.exe again, the same prompt will appear, but this time select Convert BMP to RAW. Browse to the new file, click open and again you will see the confirmation prompt. The RAW and ACT files are created at the same time. Few people will argue that this has to be the easiest and quickest way to manage ACT files. There you have it: four methods of dealing with and managing ACT files. Use the one you feel most comfortable with, or use a combination of each. |