|
| ||
|
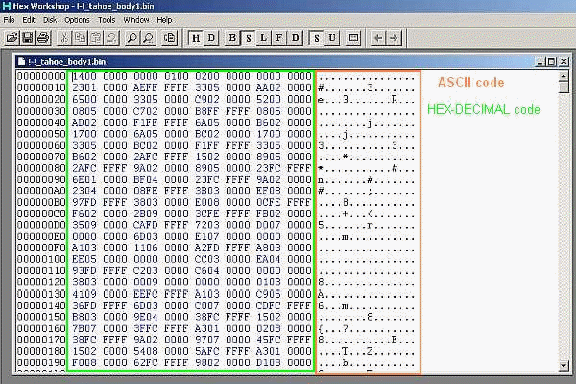
HOW DO I USE HexWorkShop - (or other similar Hex-editors) by ZOtm_BigDOGGe ----------------------------------------------------------------------------------------- Open HexWorkShop and load your BIN model. It will look like this (without the green and orange boxes or words...I added those to make the 2 areas clearer).
The area I marked with a green box is the Hex-Decimal code.....don't worry that you can't read it...you don't have to. The orange area is the same data in ASCII format. This is where you will do most of the work, but not all of it. ----------------- Press F3 and type RAW in the search window to find the first raw texture file listing. Hit enter. You should see something like this: (without the red underline)
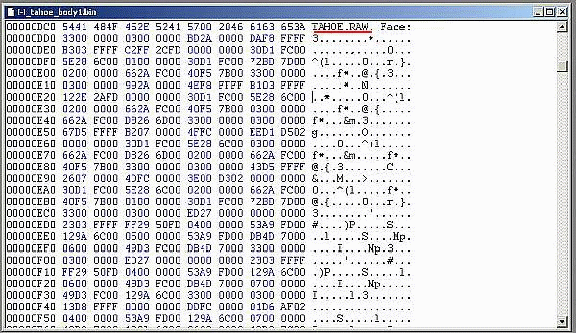
I underlined in red the RAW texture file listing - the original texture filename I need to change is called TAHOE.RAW. You MAY have to scroll up slightly to see the whole RAW filename of your model on occasion. IMPORTANT: Note that the dots in the ASCII area on the right side ARE NOT PERIODS (hexcode = 2E).....they are NULLs (hexcode = 00) used to create spaces between the separate bits of information...there's a big difference......remember this....it's important later. -------------------------- Here, I highlighted the old RAW name, and it's equivalent in the hex-code area:
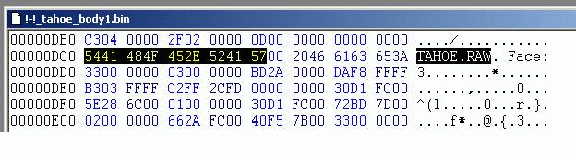
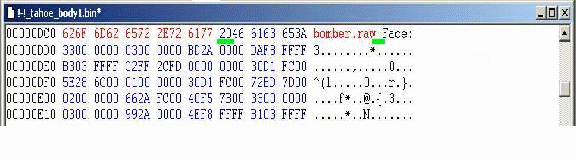
NOTE: SEE the 00 hexcode following the "W" in "RAW" ? (W hexcode = 57)......there must be at least one NULL (00) following the W when you are finished...I'll tell you how soon... --------------------------- LET's CHANGE THOSE TEXTURES The new texture name I'll use for this example is called BOMBER.RAW. I will type this into the ASCII area on the right side. Starting with the first letter in the old name TAHOE.RAW, I click on the T with my mouse, then start typing BOMBER.RAW Now it looks like this:
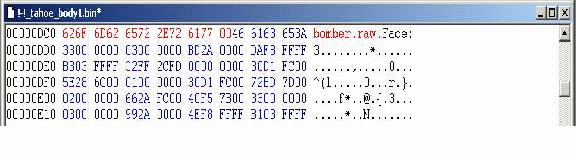
Note that the program itself highlighted the new texture filename in red , and that the same letters in hexcode are also highlighted in red on the left side.....almost done now! ---------------------------------- Like I said before, a NULL character must follow the filename. and must be inserted after the last letter in the texture name (a "W" in this case - hexcode = 77) . At this time, a SPACE character follows the BOMBER.RAW name....it's HEX code on the left is "20" (SPACEBAR = hexcode 20). - It must be changed to a null character. I put a green underline beneath the location where the NULL character must be placed in both the ASCII and HEXCODE windows below, so you know where it is I speak of...see pic:
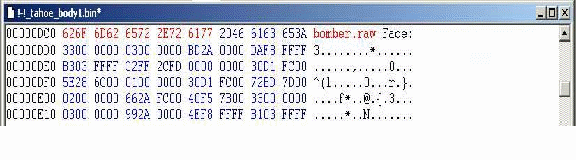
HOW DO I APPLY THE NULL CHARACTER? Now, in the hexcode area on the left side, click on the number "2" that I underlined in green, (or whatever character follows the last red hexcode-letter in your new filename), and type "00" (without the quotes") The finished product should look like this:
See the null symbol (dot) following BOMBER.RAW on the right side now? This is correct. This texture replacing task is now finished, and the BIN can be saved. ---------------------------------- WHAT IF I HAVE MORE THAN ONE TEXTURE TO REPLACE? If there is more than one new texture file being applied to your model, then instead of saving it now, press F3 again to find the next RAW file for the BIN model, and repeat the above instructions until all the RAWs that need replacing are changed.... Save it when done, and load the body BIN in Binedit...the new texture(s) should be on the body. This puppy will handle any MTM2 file size you wish to modify....no size limits anymore..... ........goodbye MDMRE's texture replacer...it's been nice, but......I've grown beyond your abilities..... =============================== EASY TIP: If you use the exact same number of characters in the new texture filename(s), then you can avoid the whole NULL portion of the task. That method may be better to use for your first attempts, until you are familar with hex-editors. IMPORTANT: use no more that 8 letters for your filename for MTM2 textures, not including the ".RAW " extension (example = 12345678.raw ) Enjoy....I hope this helps.....it took about 2 hours to write.... ;-) |