|
| ||||||||||||||||||||||||||
|
(Custom Textures) This page will talk about how to paste custom texture(s) into Traxx for use in your track.
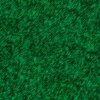
When you are using custom textures it is probably wise to have at least one base texture for each color or scenery "flavor" that you plan to use in your track. Single textures must be 64x64 pixels in size, they must be 256 colors only, and they must be in 8 bit uncompressed bitmap format. For example, in one of my tracks I used these:
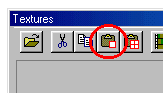
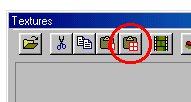
As a reminder, because I cannot emphasize too much, here is a summary of Traxx requirements for pasting custom graphics. Pasting Single Textures into Traxx Launch your favorite paint program and open the graphic file that you want to use. Then launch Traxx and open the textures box.
Next, in your paint program, copy
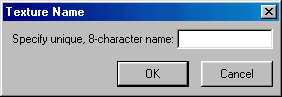
You will be prompted to give the new texture a name. You may use up to eight letters or numbers.
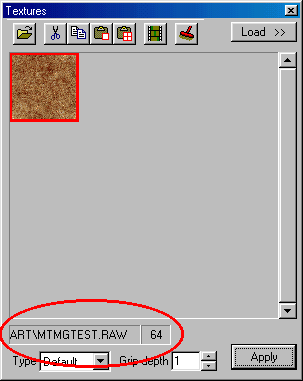
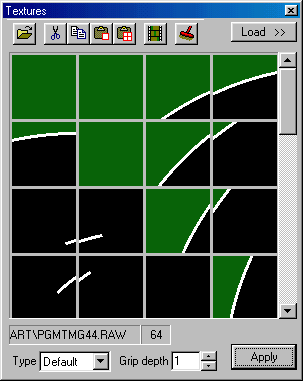
Click OK and Traxx automatically creates an ACT & RAW file (the file formats used by MTM2) and loads the new texture into the textures box. If this is the first texture loaded into Traxx, it will be tiled over the entire grid surface. Also, note that the new texture name appears at the bottom of the textures box.
You may repeat this procedure for as many textures as you like. And please note that you are not restricted to using solid or plain texture graphic files. You may create textures that make up parts of the road or hills or anything else you want to include in your track. Pasting Multiple Textures into Traxx Just as with single textures, the graphics that you want to use for your track must be 256 colors and 8 bit uncompressed bitmap format. But rather than 64x64 pixels in size, you can paste graphics up to 964x964 pixels in size (an equivalent of 16x16 grid squares), and Traxx will automatically divide the graphic into as many 64x64 ACT & RAW files (the file formats used for MTM2 terrain) as you need.
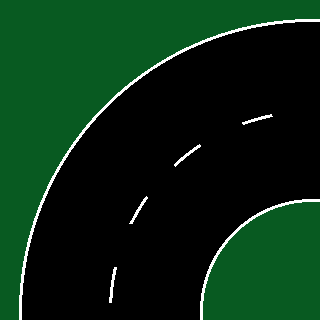
Let's note one more thing before going further. MTM2 uses a system of overlapping for terrain textures. This means that 2 pixels on the edge of each 64x64 texture overlaps 2 pixels of the textures next to it. Apparently, this is a strategy that is supposed to help make your track look it's best. But be that as it may, it also makes calculating the size of your graphics a little trickier. Hence, my funny math (anyone knows that 64 x 16 = 1024, not 964). Please click here for more information on calculating the size of your graphics. For the purpose of this section, I created this graphic of a corner using psp; it is 320x320 pixels. Yeah, I know it's not much but you'll soon get the idea.
Okay, just like with single textures, in your paint program, copy
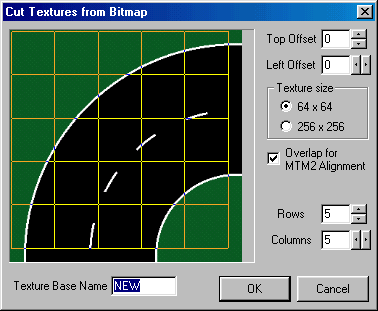
You will be prompted for further information.
There are several things you'll want to notice in this window. Texture Base Name - you must give the new textures a unique name. You may use up to six letters or numbers. Traxx will append numbers to the name in an orderly and systematic manner. More on that in a minute. Top Offset & Left Offset - notice how the yellow grid does not fit exactly over the graphic. Use these values to place the grid so that you will get the alignment you want. Texture Size - we will be using 64x64 for ground textures. Traxx will also convert 256x256 graphics for use where high resolution is desirable or as a short cut tool for making graphics for models or trucks. Rows & Columns - allows you to increase or decrease the number of rows and columns that your graphic will be divided into. Overlap for MTM2 Alignment - this is necessary in order to get the best appearance in the game. Uncheck this box if you are making a track for MTM1 or you are using Traxx to create *.raw and *.act files for models or trucks. Again, please click here for more information on calculating the size of your graphics. So, after making the appropriate adjustments, the window looks like this:
Notice the effect the offset has on the yellow grid. The name I have selected tries to be unique so that it will not conflict with other textures loaded here or in other tracks. In this case PGMTMG stands for (P)hineus (G)age (M)onster (T)ruck (M)adness (G)uild. Not very exciting perhaps, but it is unlikely that it will conflict with other people's work. Click OK and Traxx will create the necessary ACT & RAW files and load them into the textures box.
Ok, you know what comes next. Yes, that's right, it's time to paste those textures onto the terrain. It is probably wise to make a template with them the first time so that you only need to do it once. But before you groan at the prospect of tedium, this is much easier than you think. Traxx loads the textures into the textures box "in order" so that all you need to do is paste in a left to right direction. That is, all you have to do is select the first texture in the texture box then paint it in the terrain, next choose the texture to the right in the texture box and then paint it to the right of the first one in the terrain, and repeat until you finish the first row. Then continue selecting textures in a left to right manner in the texture box and start painting the next row on the terrain in a left to right direction. This is possible because Traxx numbers the textures in a very systematic and orderly way. Simply arrange the textures according to the number scheme and everything will be perfectly aligned and ready for use in your track. please click here. please click here.
| |||||||||||||||||||||||||